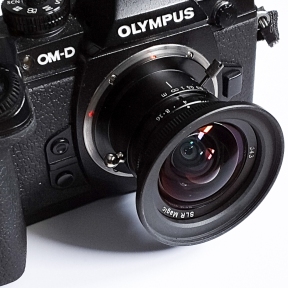
The SLR Magic 8mm F4 is an ultrawide, rectilinear lens for Micro 4/3 bodies offering 108 degrees angle of view at a very attractive price. At 300-350 US dollars, it is significantly lower than most other decent quality ultrawides in any mount.
There are two main discussions in this review. First, should you consider an ultrawide lens and second, how “good” is the SLR Magic 8mm option. To help answer the first question, I will show various techniques that can be used to make compelling photos with this type of lens. If you are drawn to the results and are further inspired to use one, then read on and see how the SLR Magic offering will meet your needs. Not only is the optical performance covered, but some very special handling considerations that you should be aware of.
First, a note on physical attributes:
- Build Quality: The lens is all metal and very solid. The focussing and aperture rings operation with silky smoothness while offering an affirming degree of resistance. I feel the build quality is superior to the plastic barreled Olympus 25mm 1.8 and 45mm 1.8. To me, it is more in the leagues of the absolutely wonderful Olympus 75mm 1.8.
- Size and weight: Small and light. Comparable to the Olympus 25mm 1.8 and 45mm 1.8. Marketed with emphasis in drone applications, it appears to have been designed with this in mind.
Download and Evaluate
To better evaluate the lens performance, feel free to download hi-res JPEGs (post processed in Lightroom and Silver Efex PRO) and RAW (.orf) files from this Google Drive link. Print them to however large you like, or try running the RAWs in your own photo editing software.
Is an Ultrawide Right for You?
When asked what ultrawide lenses are suited for, I believe many would declare them as indispensible for landscape and architecture photography. After all, how else would you cover an expansive vista or tight interior quarters in a single frame? Yet, I believe this misses the point. An ultrawide is not about getting everything “all in”. Rather, it is about realizing it as tools of extreme visual exaggeration – namely wild perspective and exploded perception of depth. It is a lens that takes much practice and patience to use effectively and different people may or may not take to the effects of such lenses.
So, rather than showing some “great shots” of the Grand Canyon or the interior of some museum, I will present some techniques to harness the visual exaggeration potentials of these lenses. Forget for a moment whether these are good pictures or not (I am learning myself). Rather, look at the effect for each technique and see if this is something of interest to you (if so, continue reading about performance, usage and conclusions).
Technique 1: Look Way Up
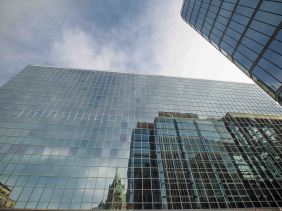
With an ultrawide lens on your camera for the first time, walk in any modern city and look up. You will be surprised how otherwise dull buildings laid out in neatly (and predictably) in blocks can form bizarre and aesthetically pleasing geometries. Move just a few meters away, rotate the camera and/or change the elevation and everything shape shifts in front of your eye. Keep on moving until you have an amazing composition – or give up and try at another location a few blocks away.
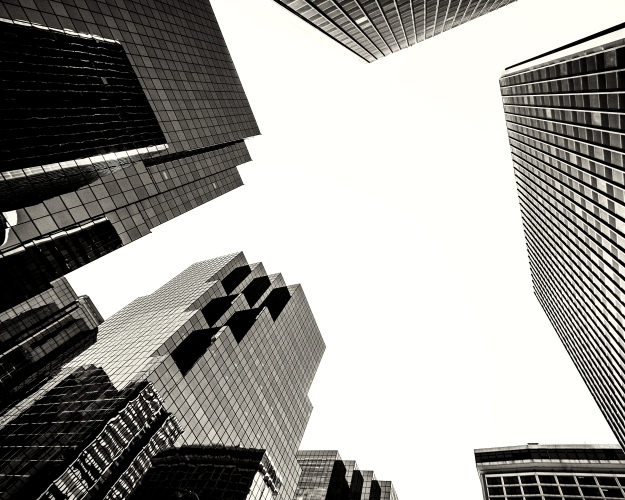
Ottawa Looking Up – SLR Magic 8mm @ f5.6
Without looking through an ultrawide, I could have never imagined these buildings this. It is like a surprise every time you look up!
For the photo above, using Lightroom I masked the sky to make it pure white, bumped up the clarity and significantly reduced the blacks before converting to B+W with Silver Efex Pro.
Looking up is not restricted to cityscapes. It can be equally effective in forests:

Mud Lake, Ottawa – SLR Magic 8mm f4 @ f8
Technique 2: Get Close to Something (and look up a bit)
An ultrawide lens is incredibly effective in getting ‘everything in’ a photo. Ironically, you have to fight to get ‘most everything out’ leaving only a few of the more important elements – especially when you first begin using such lenses. With this in mind ‘Get Close to Something (and look up a bit)’ is a technique that can be used break any ‘everything in’ tendency one might have.
It is quite simple – pick something close, and something far as the two main elements of the composition. Go very close to the first object and tilt the camera up to get rid of all the clutter on the ground (potentially, crouch down to lower yourself close to the surface).
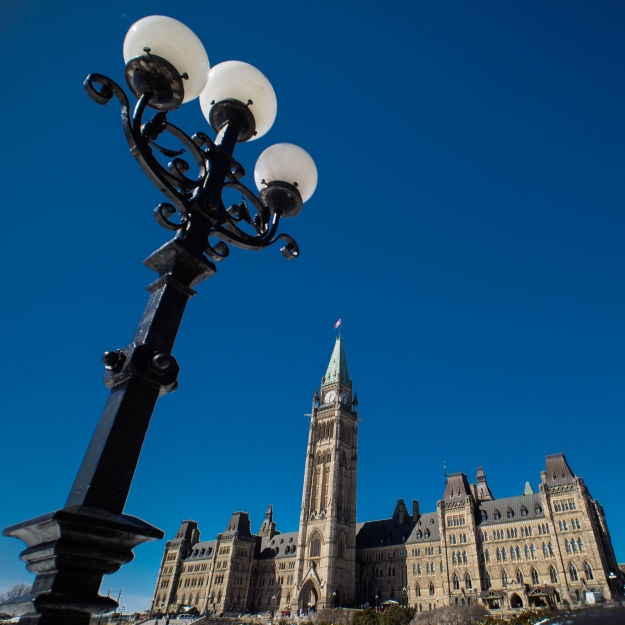
Nearby Lamb and distant Ottawa Parliment – SLR Magic 8mm @ f5.6
Parliament buildings (any parliament building) are often the subject of many average photos taken over and over again by vacationers. Hopefully, you agree I made Ottawa’s parliment more appealing with the use of this technique. In many of my ultrawide photos, I tend to do more extreme Lightroom manipulations than normal. In this case, I greatly darkened the blue sky, while increasing the saturation of the building.
Another case in point is the photo of the tree in the forest below where a rather average trunk is made much more substantial than in reality:
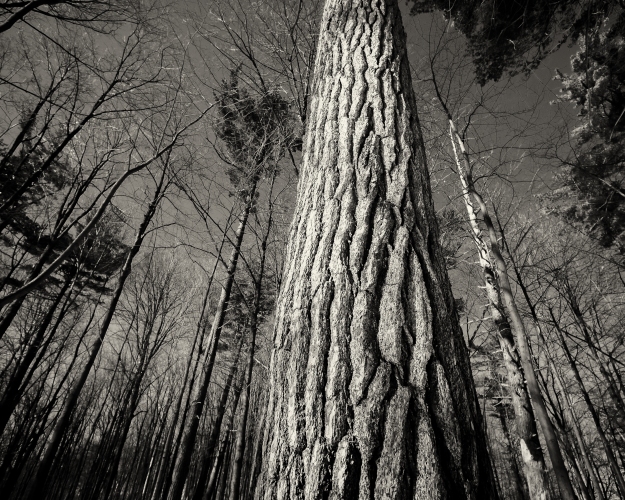
Tree and a Forest, Mud Lake (Ottawa) – SLR Magic 8mm @ f5.6
The trunk in the foreground is the ‘close element’ where as the forest is the distant element. As the trunk is so close, it really stands out because it is so large compared to the other trees in the distance. Again, tilting up a bit reduced the clutter on the ground. In Lightroom, the forest was darkened relative to the trunk before conversion to black and white using Silver Efex Pro.
Technique 3: Blur Imagination and Reality
Imagine a toy car can appearing as if were full-sized against a “real” house. An ultrawide greatly magnifies the perceived size of near by subjects relative to those in the background. Though it is surprisingly difficult make the toy look real, it is a lot of fun.
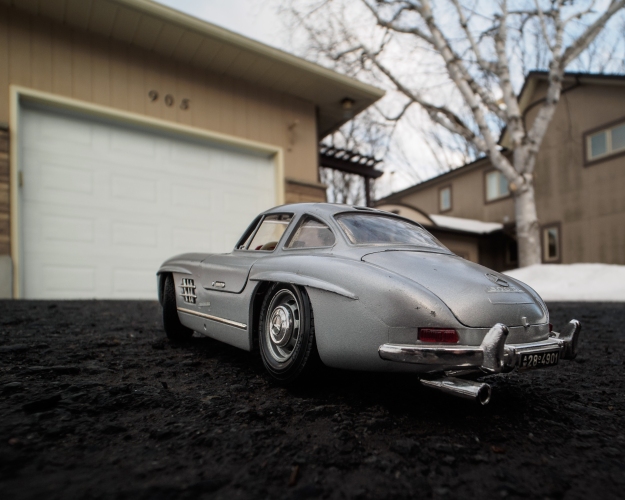
Mercedes Benz – SLR Magic 8mm @ f11
The camera was positioned right on the ground very close to the Mercedes. A lot of time was spent finding a location where it appeared to be right in front of the garage, while making the size appear realistic. f11 was selected to increase the depth of field which is otherwise very shallow given the close distance (even for a 8mm lens).
Technique 4: Stretch and Pull a Large Object
Get close to a deep, wide and tall object with an ultrawide is like trying to tame a wild horse. Distance becomes elastic – stretching way beyond what looks real while angles collapse and curvatures become … more curvy. But, with skill and practice, and an eye for some latent feature, you can make an otherwise dull object, like the Honda Civic below, really shine. But, be forewarned, moving just a few centimeters can spoil an otherwise great photo!
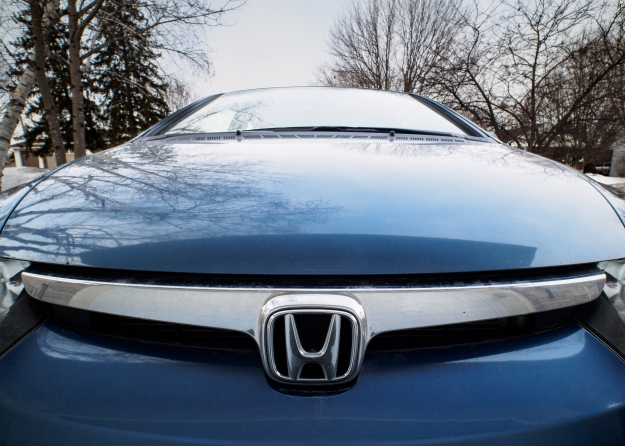
“Exaggerated” Honda Civic – SLR Magic 8mm @ f5.6
I must have spent around 5 minutes with my camera constrained to a small cube – going up/down, left/right, forward/back. The shape of the car was uncontrollably stretching with every slight move. Finally, I locked in dead center (for symmetry) at the most pleasing height and distance. The look, compared with reality, gives an elevated feeling of aggression and speed.
Performance Evaluation
Assuming you come to the conclusion of an ultrawide being good for you, the next step is to consider if the SLR Magic 8mm will meet your needs. Again, build quality if great, the price is right but what about performance?
Only you can assess whether this lens is good enough! Again, feel free to download the RAW and full-sized JPEGs from this Google Drive link so that you can better evaluate the results.
Resolution
At Distance
Two photos at every stop between f4 and f16 were taken of Ottawa’s parliament building. The red squares indicate the approximate crop for the respective center and corner sharpness test.
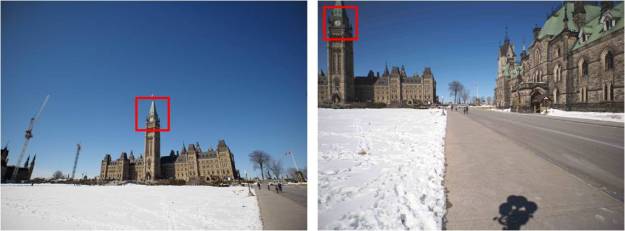
If the pictures above were printed to 8X10″, each crop would be roughly 1″ square.
| Center | Corner | |
| f4 | 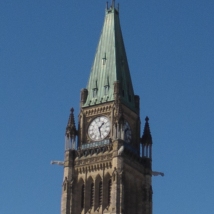 |
 |
| f5.6 | 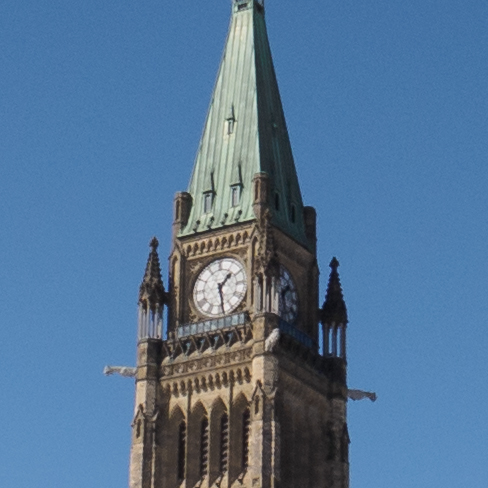 |
 |
| f8 | 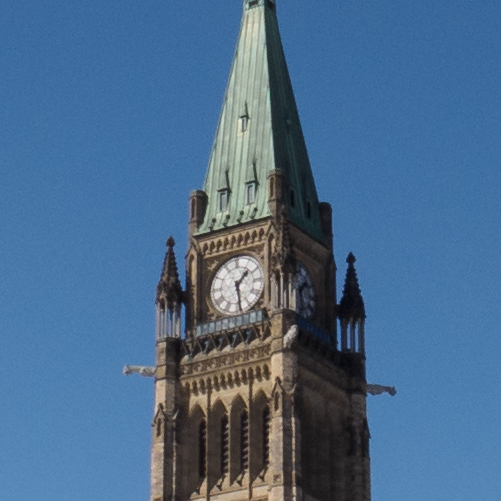 |
 |
| f11 | 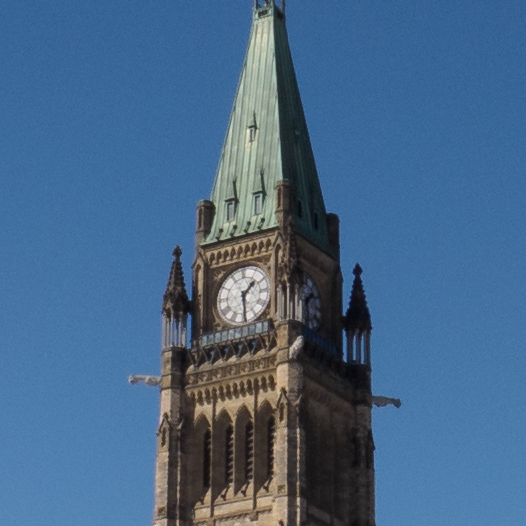 |
 |
| f16 |  |
 |
To my eyes, f5.6, f8 and f11 appear fairly close in center and corner sharpness. Wide open, at f4 and at f16, both center and corners are somewhat softer. Unless I need the speed, I would stick with either f5.6 or f8.
As you will read in the usage tips below, I recommend the use of focus peaking at all times with this lens.
Close Range
The nice thing about using a cat to test for close distance resolution is that there is always some fur that will be optimally focussed. And so, my cat Yoshi is always the subject of any new lenses I try.
Due to the 108 degree angle of view, the photo of Yoshi was taken at rather unbelievably close range (no more than 15cm). The sharpness at this distance can be gauged by the crop on the right:
 Yoshi Close-up @ f5.6 |
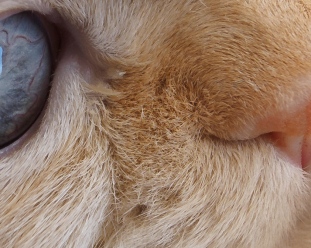 Yoshi Close-up (cropped) |
The crop reveals a decent amount of detail – more so than I would have expected for a lens in this price range. Though it is not quite as sharp as legendary lenses like the Olympus 75mm 1.8, it is quite sufficient.
Distortion
Distortion sample
Ultrawide lenses are often used for architecture where the many straight lines of buildings and rooms are rendered without any noticeable curvature, or distortion.
Therefore, an important measure of rectilinear wide lenses, such as the SLR Magic 8mm, is how well distortion is corrected.
From the un-cropped (unfortunately rather boring) photo on the left, a sliver from the bottom of the frame was cropped to emphasise the degree of distortion at the extreme edge of the frame:
Extent of barrel distortion – frame bottom of sample photo
Though some barrel distortion is visible, it is not too bad considering the difficulties correcting for distortion in ultrawide lenses. In Lightroom, the distortion can be corrected quite easily so that straight lines are once again straight. This is show in in the figure below:

Corrected barrel distortion (Light Room: Lens Correction -> Manual -> Distortion -> +10)
The bottom line – distortion of the SLR Magic 8mm is quite well controlled. In normal applications, it will hardly be noticeable. For architecture photos, visible distortions can be easily corrected. In fact, it appears lower than the well rated and expensive Olympus 7-14mm 2.8 which relies on software to reduce distortion to -2.7% from a whopping -8%.
Light Falloff
Photographing a white sheet of paper at various apertures gives a reasonable indication of light fall off:

Light Falloff at Various Apertures (focussed at infinity)
Light falloff at f4 is quite pronounced – particularly at the extreme corners. It is much improved by f5.6 and further improved at f8. Though ultrawide lenses typically have a fair bit of falloff, I don’t have other lenses in this focal length range to compare with.
In the end, does it really matter? At f5.6 and beyond, I do not find the falloff obtrusive to the point I have to do Lightroom corrections. At f4, some Lightroom corrections might be warranted (though in reality, I edge burn a lot of photos anyways, so some light fall off can be beneficial).
Extremely Important Usage Tips
This is where we discuss the quirks of the lens. If you purchase one, I suspect you might be disappointed if you don’t read the following.
Focus Peaking is Your Friend
Even with its huge depth of field, it is difficult to focus any ultrawide accurately with just the electronic viewfinder. The resolution is just not enough to discern what is in focus verses slight out of focus.
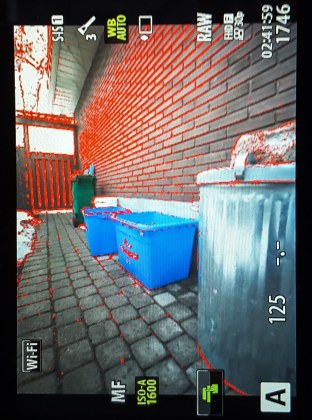
Focus Peaking – Green bin in focus…
Use of focus peaking with this lens is highly recommended – though this might seem somewhat counter intuitive due to the enormous depth of field offered by 8mm lenses.
Focusing is still a challenge with focus peaking. Due to huge depth of field, the highlighted “peaks” (suggesting sharp focus) extend over a long range. While observing the point of desired focus, I find it necessary to focus back and forth to find the point where the peak markings are the fattest.
NOTE: On my OM-D E-M1, I configure the conveniently located Fn1 button as the focus peaking toggle.
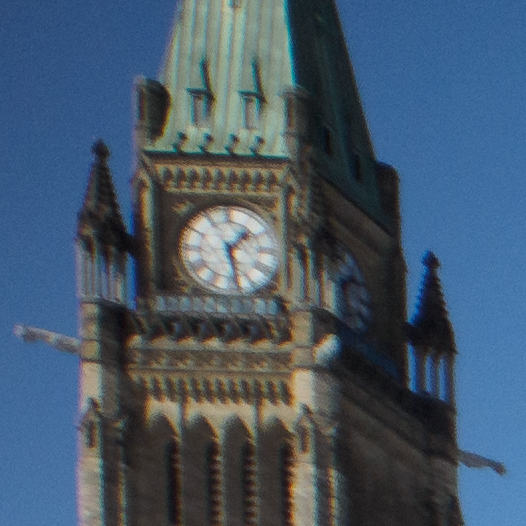
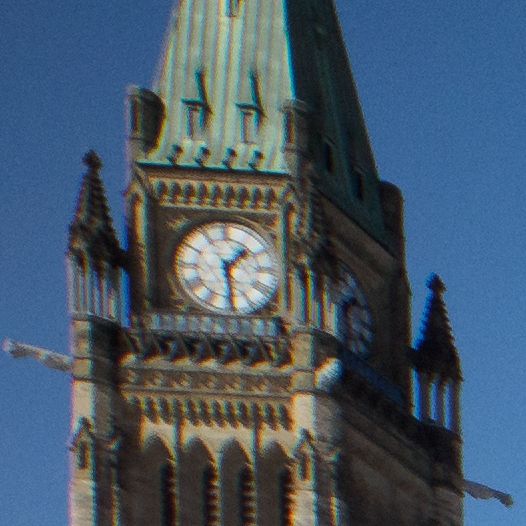
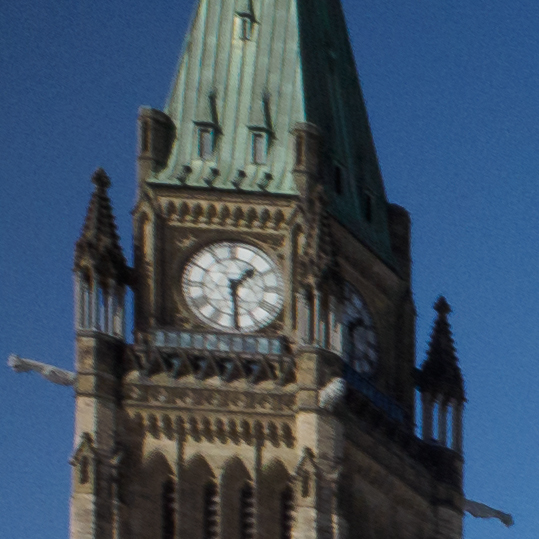
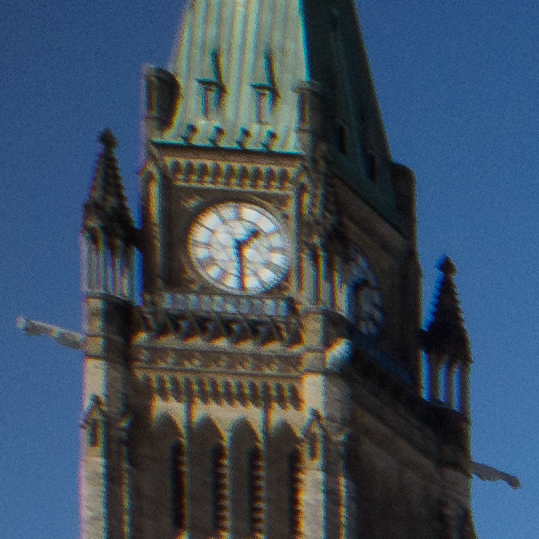
Focus at Infinity, but not Beyond…
There have been quite a few reports online with dissatisfied users were complaining of poor resolution overall. I believe I have an explanation. When focus was adjusted at the infinity marker (where it mechanically stops), distant objects were unusually blurry – suggesting the lens actually focussed beyond infinity. Using focus peaking I achieve much sharper result even even for very distant subjects (the focus setting ends up signficantly less than infinity). The crops below (about 15% of the picture height), explain it all:
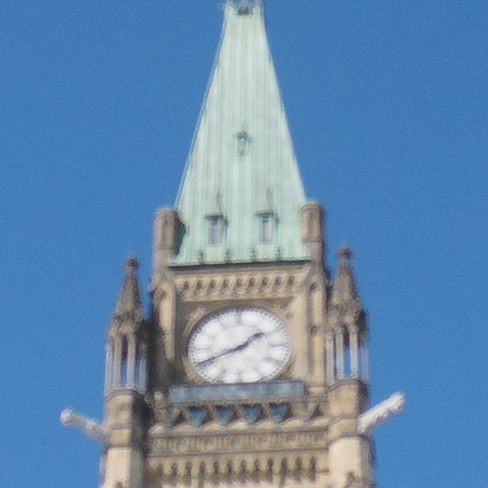 Focus @infinity mark – f4 |
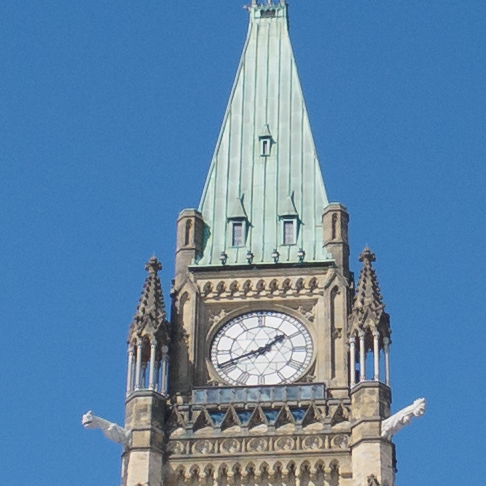 Focus < infinity, using focus peaking – f4 |
The clock on the right is satisfactorily sharp, even with the lens wide open.
One might think such a wide angle lens would have such enormous depth of field that it shouldn’t matter. Once again, I maintain that with this lens, focus peaking is truly your friend.
Focus AND aperture adjustment
When you adjust the focus ring, everything else in front rotates. This includes the aperture ring. Even though the aperture value is unchanged, it is a bit ‘different’ that they both rotate in unison
The lens is tiny, and so are the focus and aperture rings. Though there is a small silver knob to facilitate focusing, adjusting the aperture is somewhat difficult due to limited space. If, after focussing, you need to change the aperture, tighten the ‘lock’ screw to ensure focus does not change.
It is not a huge deal – I usually just keep the lens pinned at f5.6 or 8 as it offers optimal performance and since the difference in-depth of field is not huge at differing apertures.
Verdict
If the photos produced by ultrawide lenses are appealing, and you have the patience to ‘tame’ this rather challenging focal length then an ultrawide might be a good choice.
In my opinion, the SLR Magic 8mm f4 is a very compelling considering the following:
- Price – It is very reasonably priced, especially compared to the alternatives such as the Panasonic / Olympus 7-14mm lenses.
- Mechanical Quality – It is lovely.
- Optical Quality – Resolution is actually quite good between 5.6 and 11. My normal print sizes are 8X10″, and I do not see less detail compared to pictures taken with the incredibly sharp Olympus 45 and 75mm lenses. Once again, feel free to see for yourself by downloading and working with the RAW files / JPEG’s used this Google Drive link. Distortion is reasonable, especially as an ultrawide lens. Light falloff is there, but once again at 5.6 and beyond it is reasonable (at least for me).
- Handling – If speed is not of the essence, and you are comfortable in using focus peaking, then there should be no issues. But, don’t expect to operate as fast as an autofocus lens! Size is tiny and weight is low, so it is nothing to take this lens with you everywhere.
Bottom line – I feel this lens is a highly recommended if you:
- Do not want to spend huge amounts of money.
- Don’t need a zoom.
- Can live without autofocus.
- Do not need a wider aperture.
I will now share why I personally bought the lens
I tend to use short to medium telephotos about 75% of the time, and a normal lens for the greater part of what remains. In other words, I do not use wide angles lenses too much and certainly could not justify purchasing something like the Olympus 7-14mm.
BUT…. I am going to the Grand Canyon and Death Valley in May and decided an ultrawide would be nice because I have seen so many amazing photos made with this type of lens. It is because of the low price that I bought the SLR Magic 8mm. If it didn’t come out, I simply would not have bought one of the more expensive alternatives.
Now that I have it, I am really happy to have it. It is really an eye opener to use ultrawide lenses, especially being more accustomed to longer focal lengths. Though I am still learning how to handle this focal length, I have to say the whole learning process is really quite fun.
Let me know if you have any questions – I will try to answer them.
Also, check out the SLR Magic 8mm f4 group on Flickr.
One more photo for the road:

Suspended Leaf – SLR Magic 8mm @ f8


